Docker-compose
This page describes how to setup a self-managed instance of R2Devops using Docker-compose.
💻 Requirements
The system requires a Linux server. It runs in 🐳 Docker containers using a docker-compose configuration. Specifications:
- OS: Ubuntu or Debian
- Hardware
- CPU x86_64/amd64 with at least 2 cores
- 4 GB RAM
- 30 GB of storage for R2Devops
-
Network
- Users must be able to reach the R2Devops server on TCP ports 80 and 443
- The R2Devops server must be able to access internet
- The R2Devops server must be able to communicate with GitLab instance
- The installation process required to have a write access to the DNS Zone to setup R2Devops domain
- If the server is not reachable from internet or if you want to use your own certificate for HTTPS, you need to be able to generate certificate during the installation process for R2Devops domain
-
Installed software
🛠️ Installation
📥 Setup your environment
- Clone the repository on your server
git clone https://github.com/r2devops/self-managed.git r2devops cd r2devops - Create your configuration files
cp .env.example .env
cp .docker/r2devops/config.json.example .docker/r2devops/config.json
📋 Organization
In your .env file:
-
Add your organization
- If you use a SaaS version of GitLab (like
gitlab.com): add the path of your organization top-level group inORGANIZATIONvariable.envORGANIZATION="<top-level-group-name>" - Else, let the
ORGANIZATIONvariable empty.envORGANIZATION=""
- If you use a SaaS version of GitLab (like
-
(Optional) Add your license
License key
If you do not have a license key, you can let the variable
LICENSEempty (value: ""). Your R2Devops instance will be limited to 5 projects.Add your license key (provided by R2Devops): edit the
.envfile by updating value ofLICENSEvariable:.envLICENSE="<license-key>"
📄 Domain name
-
Edit the
.envfile by updating value ofDOMAIN_NAME,CERTIFICATE_EMAILandJOBS_GITLAB_URLvariables.envDOMAIN_NAME="r2devops.<domain_name>" CERTIFICATE_EMAIL="<your_email>" JOBS_GITLAB_URL="https://<url_of_your_gitlab_instance>"Example with domain name
mydomain.comDOMAIN_NAME="r2devops.mydomain.com" CERTIFICATE_EMAIL="tech@mydomain.com" JOBS_GITLAB_URL="https://gitlab.mydomain.com" -
Edit the
.docker/r2devops/config.jsonfile by updatingapiUrl,apiUrlIdentitiesandgitLabApiUrlparameters{ "appTitle": "R2Devops", "apiUrl": "https://r2devops.<domain_name>/api", "gitLabApiUrl": "https://<gitlab_intance_domain>", "selfHosted": true, "docUrl": "https://docs.r2devops.io" }Example with domain name
mydomain.com"apiUrl": "https://r2devops.mydomain.com/api", "gitLabApiUrl": "https://gitlab.mydomain.com", -
Create DNS record
- Name:
r2devops.<domain_name> - Type:
A - Content:
<your-server-public-ip>
- Name:
Certificate
A certificate will be auto-generated using Let's encrypt at the application launch
🦊 GitLab OIDC
R2Devops uses GitLab as an OAuth2 provider to authenticate users. Let's see how to connect it to your GitLab instance.
Create an application
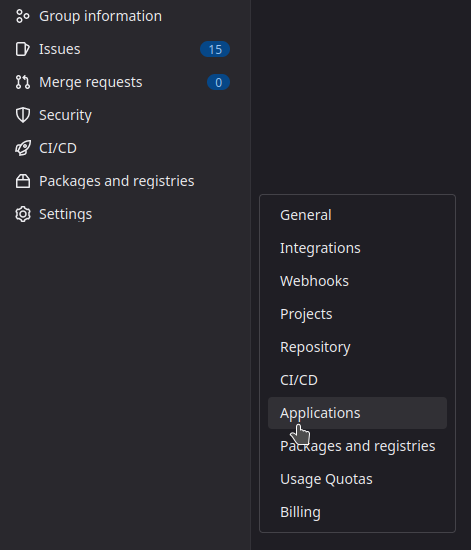
Choose a group on your GitLab instance to create an application. It can be any group. Open the chosen group in GitLab interface and navigate through Settings > Applications:
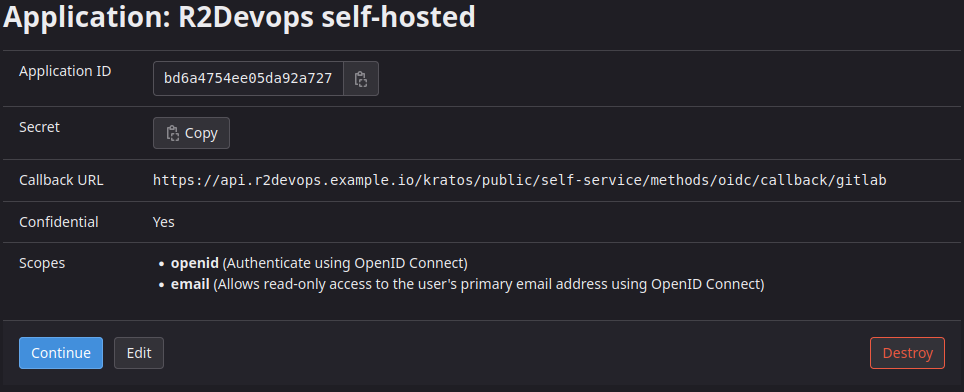
Then, create an application with the following information :
- Name:
R2Devops self-managed - Redirect URI :
https://r2devops.<domain_name>/api/auth/gitlab/callback - Confidential:
true(let the box checked) - Scopes:
api
Click on Save Application and you should see the following screen:
Update the configuration
In .env file:
- Copy/paste the
Application IDand theSecretfrom the application you just created.envGITLAB_OAUTH2_CLIENT_ID="<application-id>" GITLAB_OAUTH2_CLIENT_SECRET="<application-secret>"
🔐 Generate secrets
Generate random secrets for all components:
sed -i."" "s/REPLACE_ME_BY_SECRET_KEY/$(openssl rand -hex 32)/g" .env
sed -i."" "s/REPLACE_ME_BY_JOBS_DB_PASSWORD/$(openssl rand -hex 16)/g" .env
sed -i."" "s/REPLACE_ME_BY_JOBS_REDIS_PASSWORD/$(openssl rand -hex 16)/g" .env
sed -i."" "s/REPLACE_ME_BY_S3_SECRET_KEY/$(openssl rand -hex 16)/g" .env
🚀 Launch the application
Congratulations
You have successfully installed R2Devops on your server 🎉
Now you can launch the application and ensure everything works as expected.
Run the following command to start the system:
docker compose up -d
Reconfigure
If you need to reconfigure some files and relaunch the application, after your updates you can simply run the command again to do so.
docker compose up -d
What's next
Now that you have finished this tutorial, here are some simple tasks you should give a try :
- 📈 Learn how to use the platform by reading the documentation
- 📕 Import your first job, here is the tutorial
Not the same behavior
Did you encounter a problem during the installation process ? See the troubleshooting section.
🔄 Backup and restore
Data required to fully backup and restore a R2Devops system are the following:
- Configuration file:
.env - Databases:
- PostgreSQL database of Jobs service
- Files data:
- Files stored in the Minio service
- File storing data about certificate for Traefik service
All these data can be easily backup and restored using 2 scripts from the installation git repository:
backup.shrestore.sh
💽 Backup
To backup the system, go to your installation git repository and run the following command:
./backup.sh
The script will create a backups directory and create a backup archive inside it prefixed with the date (backup_r2-$DATE)
Regular backup
You can use a cron job to perform regular backups. Here is a cron job that launch a backup every day at 2am:
0 2 * * * /r2devops/backup.sh
crontab -e. Check more information about cron jobs here. 🛳️ Restore
To restore a backup from scratch on a new system, follow this process:
- Be sure that your new system is compliant with requirements
- Copy the backup file on your new server
- Clone the installation repository
git clone https://gitlab.com/r2devops/self-managed.git r2devops cd r2devops/docker-compose - If the IP address of your server changed from your previous installation, update your DNS records. See section 2 of domain configuration
- Launch the restore script
./restore.sh <path_to_your_backup_file>
Any errors during the restore process ?
Did you encounter a problem during the restore process ? See the troubleshooting section.