Kubernetes
This page describes how to run a self-managed instance of R2Devops on Kubernetes.
💻 Requirements
- A Kubernetes cluster with:
- One ingress controller(ex: Nginx or Traefik)
- A certificate manager with a ACME provider: cert-manager
- Only if you run external services (PostgreSQL and Redis) in Kubernetes: the ability to provision persistent volumes in your cluster
- Your local environment with CLI to interact with Kubernetes API:
- Write access to the DNS zone of the domain to use with R2Devops
- A user account on the GitLab instance
🛠️ Installation
The Helm chart used in this documentation allows installing all these services
embedded in the chart as dependencies or to use external S3, PostgreSQL
and/or Redis. Both alternatives are detailed below.
📥 Initialize your cluster
- Choose a namespace name and set it in a variable
export R2DEVOPS_NS="r2devops" - Create the namespace
kubectl create ns $R2DEVOPS_NS - Add R2Devops repo
helm repo add r2devops https://charts.r2devops.io/
📄 Domain name
You need a domain to run R2Devops. For example, if you have the domain name
mydomain.com:
- R2Devops URL will be
https://r2devops.mydomain.com
-
Create DNS record
- Name:
r2devops.<domain_name> - Type:
A - Content:
<your-cluster-public-ip>
- Name:
🦊 GitLab OIDC
R2Devops uses GitLab as an OAuth2 provider to authenticate users. Let's see how to connect it to your GitLab instance.
-
Choose a group on your GitLab instance to create an application. It can be any group. Open the chosen group in GitLab interface and navigate through
Settings > Applications: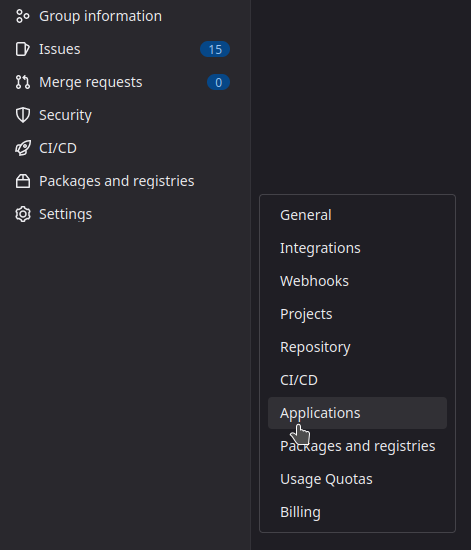
-
Then, create an application with the following information
- Name:
R2Devops self-managed - Redirect URI :
https://r2devops.<domain_name>/api/auth/gitlab/callback - Confidential:
true(let the box checked) - Scopes:
api
- Name:
-
Click on
Save Applicationand you should see the following screen: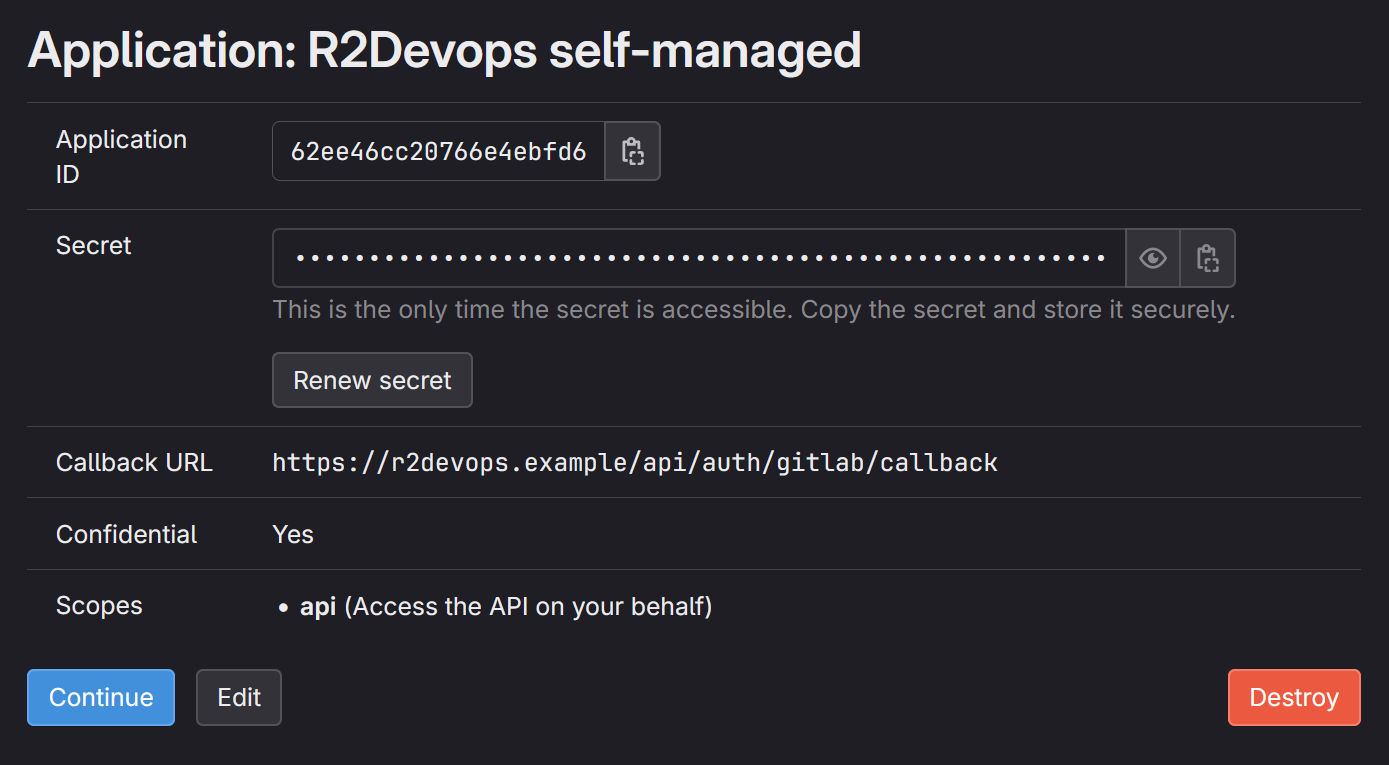
-
Store
Application IDandSecretsomewhere safe, we will need to use them in next step
⚙️ Configure values
This section describes how to configure your custom values file. The default
values.yaml is available
here.
Two examples are available at the end of this documentation:
For the following sections, we assume that your custom value file will be
located in your current directory and be named custom_values.yaml
🔐 Secrets
This section is optional. You need to follow this section only if you want to store secrets values as kubernetes secrets instead of writing them in your custom value file.
-
R2Devops secret
Replace all occurrences of
REDACTEDby your R2Devops secrets encoded in base64 and create following secret:license-key: your R2Devops licensesecret-key: 256 bit secret key used to encrypt sensitive data (openssl rand -hex 32)gitlab-oauth2-client-id: Application ID of the GitLab applicationgitlab-oauth2-client-secret: Secret of the GitLab application
apiVersion: v1
kind: Secret
metadata:
  name: r2devops-secret
  namespace: r2devops
type: Opaque
data:
  license-key: REDACTED
  secret-key: REDACTED
  gitlab-oauth2-client-id: REDACTED
gitlab-oauth2-client-secret: REDACTED -
PostgreSQL secret
Replace
REDACTEDby your postgres password encoded in base64. If you want to use postgres embedded in this chart, choose the value.apiVersion: v1
kind: Secret
metadata:
name: postgresql-secret
namespace: r2devops
type: Opaque
data:
password: REDACTED -
Redis secret
Replace
REDACTEDby your redis password encoded in base64. If you want to use redis embedded in this chart, choose the value.apiVersion: v1
kind: Secret
metadata:
name: redis-secret
namespace: r2devops
type: Opaque
data:
password: REDACTED
🤖 R2Devops
Add R2Devops related configuration in your new values file custom_values.yaml:
-
Add license key (provided by R2Devops) and R2Devops domain
License keyIf you do not have a license key, you can let the variable
LICENSEempty (value: ""). Your R2Devops instance will be limited to 5 projects.front:
host: 'r2devops.mydomain.com'
jobs:
host: 'r2devops.mydomain.com'
# Not using secret for license (comment if you use secret)
extraEnv:
- name: LICENSE
value: '<license-key>'
- name: SECRET_KEY
value: '<secret-key>'
- name: GITLAB_OAUTH2_CLIENT_ID
value: '<gitlab-oauth2-client-id>'
- name: GITLAB_OAUTH2_CLIENT_SECRET
value: '<gitlab-oauth2-client-secret>'
# Using existing secret for license (uncomment if you use secret)
#extraEnv:
# - name: LICENSE
# valueFrom:
# secretKeyRef:
# name: "r2devops-secret"
# key: "license-key"
# - name: SECRET_KEY
# valueFrom:
# secretKeyRef:
# name: "r2devops-secret"
# key: "secret-key"
# - name: GITLAB_OAUTH2_CLIENT_ID
# valueFrom:
# secretKeyRef:
# name: "r2devops-secret"
# key: "gitlab-oauth2-client-id"
# - name: GITLAB_OAUTH2_CLIENT_SECRET
# valueFrom:
# secretKeyRef:
# name: "r2devops-secret"
# key: "gitlab-oauth2-client-secret"
worker:
replicaCount: 10 # Default is 5. Increase it depending of your needs -
Add your GitLab instance domain and organization
OrganizationIf you use a SaaS version of GitLab (like
gitlab.com): add the name of your organization top-level group inorganization. Else, let it emptygitlab:
domain: 'https://gitlab.mydomain.com'
organization: '' -
Add your Ingress configuration
ingress:
  enabled: true
  className: '' # Add class name for your ingress controller
  annotations: {} # Add annotation required by your ingress controller or certificate manager
📘 PostgreSQL
You can choose between 2 options: use postgresql embedded in this chart or use an external postgresql.
Add following configuration (1 OR 2) in your custom_values.yaml file:
-
Use postgresql embedded in this chart
postgresql:
  dependency:
    enabled: true
  global:
    postgresql:
      # Not using secret for auth (comment if you use secret)
      auth:
        password: REPLACE_ME_BY_NEW_POSTGRESQL_PASSWORD
        postgresPassword: REPLACE_ME_BY_NEW_POSTGRESQL_PASSWORD

      # Using existing secret for auth (uncomment if you use secret)
      #auth:
      #  username: r2devops
      #  existingSecret: "postgresql-secret"
      #  secretKeys:
      #    adminPasswordKey: "password"
# userPasswordKey: "password" -
Use an external postgresql (database must be created)
postgresql:
  dependency:
    enabled: false
  custom:
    host: REPLACE_ME_BY_POSTGRES_HOST
    dbName: REPLACE_ME_BY_POSTGRES_DB_NAME
    sslmode: 'require'
    port: 5432
  global:
    postgresql:
      # Not using secret for auth (comment if you use secret)
      auth:
        username: REPLACE_ME_BY_POSTGRES_USERNAME
        postgresPassword: REPLACE_ME_BY_POSTGRES_PASSWORD

      # Using existing secret for auth password (uncomment if you use secret)
      #auth:
      #  username: r2devops
      #  existingSecret: "postgresql-secret"
      #  secretKeys:
      #    adminPasswordKey: "password"
      #    userPasswordKey: "password"
📕 Redis
You can choose between 2 options: use redis embedded in this chart or use an external redis.
Add following configuration (1 OR 2) in your custom_values.yaml file:
-
Use redis embedded in this chart
redis:
  dependency:
    enabled: true

  # Not using secret for auth (comment if you use secret)
  auth:
    password: REPLACE_ME_BY_NEW_REDIS_PASSWORD

  # Using existing secret for auth (uncomment if you use secret)
  #auth:
  #  existingSecret: "redis-secret"
# existingSecretPasswordKey: "password" -
Use an external redis (database must be created)
redis:
  dependency:
    enabled: false
  custom:
    port: 6379
    host: REPLACE_ME_BY_REDIS_HOST
    user: REPLACE_ME_BY_REDIS_USENAME
    cert: |
      REPLACE_ME_BY_REDIS_TLS_CERTIFICATE

  # Not using secret for auth (comment if you use secret)
  auth:
    password: REPLACE_ME_BY_REDIS_PASSWORD

  # Using existing secret for auth (uncomment if you use secret)
  #auth:
  #  existingSecret: "redis-secret"
  #  existingSecretPasswordKey: "password"
🚀 Install the chart
Run the following command:
helm upgrade -n $R2DEVOPS_NS --install r2devops r2devops/r2devops -f custom_values.yaml
You have successfully installed R2Devops on your Kubernetes cluster 🎉
Now that you have finished this tutorial, here are some simple tasks you should give a try :
- 📈 Learn how to use the platform by reading the documentation
- 📕 Import your first template, here is the tutorial
Did you encounter a problem during the installation process ? See the troubleshooting section.
📚 Configuration example
The following examples run in a Kubernetes cluster using nginx as
ingressController, cert-manager and a clusterIssuer named
letsencrypt-production
📦 No external services
This is an example of custom values.yaml file using all services from chart
dependencies.
front:
host: "r2devops.mydomain.com"

    jobs:
      host: "r2devops.mydomain.com"
      extraEnv:
        - name: LICENSE
          value: "REDACTED"
        - name: SECRET_KEY
          value: "REDACTED"
        - name: GITLAB_OAUTH2_CLIENT_ID
          value: "REDACTED"
        - name: GITLAB_OAUTH2_CLIENT_SECRET
          value: "REDACTED"

    gitlab:
      domain: "https://gitlab.mydomain.com"

    worker:
      replicaCount: 15

    ingress:
      enabled: true
      className: "nginx"
      annotations:
        cert-manager.io/cluster-issuer: "letsencrypt-production"

    # ref. https://github.com/bitnami/charts/blob/main/bitnami/postgresql/values.yaml
    postgresql:
      dependency:
        enabled: true
      global:
        postgresql:
          auth:
            password: REDACTED
            postgresPassword: REDACTED

    # ref. https://github.com/bitnami/charts/blob/main/bitnami/redis/values.yaml
    redis:
      dependency:
        enabled: true
      auth:
        password: REDACTED
📥 External services
This is an example of custom values.yaml file using external services for
PostgreSQL and Redis.
front:
host: "r2devops.mydomain.com"

    jobs:
      host: "r2devops.mydomain.com"
      extraEnv:
        - name: LICENSE
          value: "REDACTED"
        - name: SECRET_KEY
          value: "REDACTED"
        - name: GITLAB_OAUTH2_CLIENT_ID
          value: "REDACTED"
        - name: GITLAB_OAUTH2_CLIENT_SECRET
          value: "REDACTED"

    gitlab:
      domain: "https://gitlab.mydomain.com"

    worker:
      replicaCount: 20

    ingress:
      enabled: true
      className: "nginx"
      annotations:
        cert-manager.io/cluster-issuer: "letsencrypt-production"

    # ref. https://github.com/bitnami/charts/blob/main/bitnami/postgresql/values.yaml
    postgresql:
      dependency:
        enabled: false
      global:
        postgresql:
          auth:
            username: REDACTED
            postgresPassword: REDACTED
      custom:
        host: "database-1.REDACTED.us-east-1.rds.amazonaws.com"
        port: 5432
        dbName: "r2devops"
        sslmode: "require"

    # ref. https://github.com/bitnami/charts/blob/main/bitnami/redis/values.yaml
    redis:
      dependency:
        enabled: false
      auth:
        password: REDACTED
      custom:
        port: 6379
        host: "REDACTED"
        user: "REDACTED"
        cert: |
          -----BEGIN CERTIFICATE-----
          REDACTED
          -----END CERTIFICATE-----
⏫ Update
- Update R2Devops Helm repository
helm repo update - Run the helm upgrade
helm upgrade -n $R2DEVOPS_NS --install r2devops r2devops/r2devops -f custom_values.yaml - You have successfully updated R2Devops 🎉